This tutorial outlines the stylistic details that make opus anglicanum embroidery unique, and provides instructions in the basics of how to emulate the style in your own embroidery.
What is Opus Anglicanum?
Opus Anglicanum is Latin for “English Work”, and refers to a style of embroidery practiced in England from approximately 1200-1350 c.e. It is typified by underside couched gold and silver thread, and silk thread worked in split stitch to create flowing details and shading often referred to as “painting with thread”. A handful of ecclesiastical examples survive to this day. There are also stylistically similar secular embroideries, especially contemporary French embroidery on purses, and embroideries created in the following century throughout Europe that have a similar aesthetic but use very different techniques.
Stylistic Details
Chasuble (with Opus Anglicanum Embroidery) – Feather Detail showing that the individual stitches follow the same direction as the veins on real feathers, and are accented with a couched stitch showing the shaft of each feather.
Metal threads are typically used for halos and backgrounds or frames, and sometimes robes or gowns, worked almost exclusively in an underside couching stitch. This is done because it saves the couching thread from wear, and it creates a hinge in the metal thread, allowing the finished piece to move and flow, rather than being overly stiff. Background stitches are often placed in a way that creates a pattern on the finished piece, such as herringbone, lattice, chevrons, or florals. Halos are stitched in an oval or circle around the subject’s head, or in a vertical pattern. Goldwork often follows the flow of garments in the same manner silk threads would. When it does not, the shaded details in silk will follow the flow of the garments, while the goldwork on the body of the garment will be laid out in a pattern such as chevrons or herringbone.
Chasuble (with Opus Anglicanum Embroidery) – Detail showing the herringbone pattern created in the robe and cloak by patterned underside couching, as well as more complicated stitching creating dynamic detail on the cloak border, book, and bag.
Detail of English Altar Frontal, 1315-35
Silks are worked in split stitch, often very tiny (as small as 2mm in detailed areas like faces), using three or more shades of each color to create detailed flow and shading of the figures, objects, and garments. The direction of the stitches is important to indicate flow and direction. For example, arched stitches across the forehead, circles on the cheeks, turn on the tip of the nose, and arched or circled stitches on the chin to give a feeling of roundness and fullness. Stitches follow the folds of fabric, and the flow of hair.
Pale pink thread is sometimes worked in a spiral on the cheeks of faces to give them fullness and definition.
Hair is usually worked in bands of contrasting colors to show flow, wave, and curl.
Eyes are proportionally large and teardrop shaped.
Black thread is usually worked as an outline to give further definition. This is usually done on faces and in other areas requiring minute detail, and sometimes it is used to outline an entire figure or object.
Complex Opus Anglicanum embroideries can also include surface couching and complex decorative stitching in accent areas, especially in the background or on object and frame details, and sometimes is also decorated with pearls, stones, and gems.
Chasuble (with Opus Anglicanum Embroidery) – Man’s Face Detail showing arched stitches along the brow and eyelid, a small spiral on the closer cheek, vertical stitching down the length of the nose, vertical stitches on the upper lip, and curved stitches along the chin.Chasuble (with Opus Anglicanum Embroidery) – Wpman’s Face Detail showing arched stitches along the brow and eyelid, a large spiral on the closer cheek, vertical stitching down the length of the nose, vertical stitches on the upper lip, and curved stitches along the chin.
Materials
Fabric ready to be embroidered, whip stitched onto a scrolling frame in the style of a slat frame.
You will need a frame of some sort to hold your fabric taut throughout the embroidering process. Round hoops work decently, but they tend to not hold the material very securely and must be constantly re-tightened, which can result in puckering of the embroidery. Scrolling frames or slat frames work much more reliably. Be sure to whip stitch your fabric on all sides so it is held under even tension on all sides. If you choose not to use a frame while stitching the silk, watch the tension of each stitch very carefully, as it is easy to pull too tight and create puckering or leave the the stitches too loose so they don’t lay smoothly in the embroidered surface.
In period, Opus Anglicanum was always worked on linen material. This was a very fine, tightly woven fabric that is difficult to find available in the modern market. The only ideal fabric I have found is called “ecclesiastical linen” from Hedgehog Handworks, which is extremely expensive, but very little yardage is needed for most embroidery projects. Try to get a fabric with the highest possible thread count per inch, as this makes it easier to accurately place tiny, detailed stitches. Handkerchief weight linen is the easiest to find but is a bit lightweight, so you may want to use two layers. DO NOT use modern evenweave fabrics, as these are entirely unlike any period fabrics and they have too few threads per inch to be suitable for Opus Anglicanum style embroidery.
Opus Anglicanum Embroidery in the collection of Dumbarton Oaks Research Library and Collection – This textile is a fragment of an English Gothic opus anglicanum (“English work”) embroidery dating to ca. 1320-1340. As presently preserved, the textile is assembled from two fragments, each eleven and a half inches wide, that are seamed together vertically down the center. – http://ica.princeton.edu/opus-anglicanum/view.php?record_no=830
If you are embroidering on velvet, place linen over the velvet while embroidering to provide a clean foundation for your embroidery. After the embroidery is finished, trim away any excess linen.
Silk thread in period was flat silk, and flat silk lends itself exceptionally well to creating a beautiful split stitch. It also has a beautiful sheen that is lost in most twisted silk threads, as twisted silk is often manufactured from shorter filaments. It has been noted by some people that some extant pieces appear to have a slight twist, but I argue that the appearance of slight twist can be created while embroidering, and is not necessarily an inherent property of the threads used. In my own experience I have found that unless I take great care to keep it untwisted, the flat silk will have a tendency to twist slightly as I work.
To my knowledge, there are only three modern manufacturers of flat silk. The first is Soie Ovale, made by Au Ver a Soie in France. The second is the flat silks sold by the Japanese Embroidery Center (JEC). The third is “floss silk” sold by Pipers Silks. All three are genuine flat silks, composed of individual long filaments of silk, and are excellent quality, but do have slightly different properties. The Soie Ovale is slightly more robust, such that one stitch of the JEC silk is about 2/3 the thickness of the Soie Ovale. The JEC silk is a much longer roll at 60 meters vs. 15 meters on a roll of Soie Ovale. The JEC silk also has a much more delicate feel to it. This means the JEC silk will lend itself well to creating finer details, but you will have to make a great many more stitches total to finish a piece of embroidery. I do not yet have personal experience with Pipers Silks, but I have been told that it is a finer silk than even the JEC silk. In the USA, Soie Ovale may be purchased through Hedgehog Handworks. The JEC silk may be purchased through the Japanese Embroidery Center Store. The “floss silk” may be found through Pipers Silks.
Fragment (From an Orphrey Band), 1400/50 – http://www.artic.edu/aic/collections/artwork/143679
Underside couching was done with a fine linen thread in period, but this can be hard to find now. Since the couching will not be visible on the finished piece, all-purpose thread will work fine.
Metal threads used are usually very thin. I recommend using thread that is no larger than .5mm, and ideally thinner. In period metal threads were made from a thin strip of metal (usually gold or silver) wrapped around a silk core. Imitation gold and silver are far more economical, but genuine gold and silver are also available through specialty embroidery suppliers catering to gold embroiderers. I buy my metal threads through the Japanese Embroidery Center Store and Hedgehog Handworks.
You will need a fine gauge embroidery needle for embroidering the flat silk, and a large gauge needle for the underside couching. When embroidering with the flat silk you want the needle to make as small a hole as possible so it will disappear. For the underside couching you want a large hole so you can cleanly pass the needle up through the fabric and then back down through exactly the same hole.
Beeswax or other thread conditioner makes underside couching far easier.
Flat Silk Embroidery Tips and Techniques
The greatest challenge of working with flat silk is snagging. Flat silk is very delicate, and will snag on anything rough, be that exposed wood on your embroidery frame, or dry skin. I highly recommend keeping hand lotion handy and moisturizing whenever needed, but be sure to let the moisturizer soak in completely before handling the silk or it may cause discoloration. Also consider clipping and filing your nails, and using exfoliants like salt or sugar scrubs.
For a newcomer to flat silk embroidery, it is usually easiest to work in short lengths, no more than a 12” at a time, and possibly less. By doing this, if the silk snags or knots beyond use you are only losing a short length of your silk. As you become more comfortable using the flat silk you can increase the working length as much as you are comfortable with. I tend to work with lengths of a yard or so.
Also keep the eye of your needle close to the tail end, maybe only three or four inches from the end. It helps to knot the thread around the eye so it doesn’t pull free constantly. It’s fairly common for a modern needles to have small imperfections in the eye that will abrade and damage the delicate silk, so if you try to keep the needle closer to your work and slide it as you go, you are likely to find that the filaments have been damaged, lost their beautiful sheen, and possibly even been cut. If you find your needle is damaging or cutting your silk quickly, try switching needles until you find one that does less damage.
Split stitch is worked in a manner similar to a back stitch.
Stitch forward a full stitch length.
Come back up through the stitch you just made about 1/3 of its length from the end, splitting the threads of the prior stitch in half.
Stitch forward a full stitch length.
Come back up through the stitch you just made about 1/3 of its length from the end, splitting the threads of the prior stitch in half.
Repeat.
In areas with a lot of compact detail, like faces and ornaments, stitches should be correspondingly compact, between 1mm and 2mm. In other areas where you want to give the impression of luxurious flow, like on the folds of a long gown, the stitches can elongate to 3mm. If you find that your small stitches do not look as delicate as you would like, go with a more delicate flat silk, or split your silk. The filaments can be split and worked in smaller groups like with stranded floss.
Stitch in directions that flow with the shape of the subject being embroidered. Make arched foreheads, round cheeks and nose tips, and curved chins; stitch in sweeping curves and lines along the folds of fabric; stitch down the length of an arm rather than going across; sweep down the neck and then curve across the shoulderbones; and follow the fur direction of a dog or a unicorn. The goal is to make it look like it was painted, so stitch with a mind for the flow of the piece so it will be as dynamic as possible.
Stitch the same direction in each part of the garment to create a smooth appearance and avoid a striped look. Do this even if that means you have to stop, go back to the other side, and start again to create the next row of stitches. Also, stagger your stitches so they are offset on each row to avoid making stripes with your stitch points.
Pack your stitches as close together as you can manage to avoid any gaps in your stitching that may show your ground fabric. All you want to see is the silk. If you find you have gaps after you finish an area, go back in and make a few more stitches, following the same direction as before, to fill in the gap.
Outline the face and any other areas before filling them in. By doing it first, the outline will be squished by the surrounding rows of stitches and won’t overpower the shading. If you outline last, it will most likely be forced to sit on top of the other stitches and can appear overstated or overly bold.
To knot or not knot is a matter of personal preference. Which I do depends upon the individual piece of embroidery. In the case of Opus Anglicanum I usually do not knot, because there is more than enough thread on the back of the piece to tuck the tails to secure them and the piece is not likely to receive much, if any, wear or washing.
Metal Thread Underside Couching Tips and Techniques
Have a special set of shears just for cutting your metal threads. DO NOT use your nice embroidery snips on any metal threads, or you will ruin them very quickly. I find kitchen shears and crafting shears are both extremely nice for cutting metal threads.
Don’t be afraid to work with long lengths of metal thread and couching thread. Underside couching tends to cover a lot of distance fairly quickly, and metal threads tend to ravel badly at the cut ends, so it saves a lot of time and lost material to stop and start less frequently. For couching you can work straight off the spool since the thread does not need to pass through the fabric.
Use a large gauge needle for your couching thread. The larger hole makes it easier to put the needle back down through the same exact hole.
Wax your couching thread liberally. It will make the sewing process easier. You can also lubricate your metal thread if you wish, but that is probably not necessary except on the plunged ends since it will not be passing through the fabric.
Tuck the tail ends of your metal thread through the stitches on the backside of the piece to stop it from fraying.
Mark on your fabric the pattern for your underside couching stitches before you start stitching. For example, if you want a diamond pattern, use a ruler to draw your diamonds on the fabric before you stitch.
Keep your metal threads as close together as you can manage to avoid gaps and glimpses of the underlying fabric. This is where a high thread count foundation material really helps, because it will allow you to place your stitches very close together when using very thin metal thread. If you are working on a low thread count linen (<30 threads per inch), it may be difficult or impossible to completely cover your background with even and clean stitches, or you may be forced to use a thicker metal thread than is ideal for this style of embroidery.
Start and end metal threads at the edge of the area to be embroidered with metal, NEVER at a couching stitch location. If you end and start anew in the middle of the background at a couching stitch location, it can cause an awkward pucker.
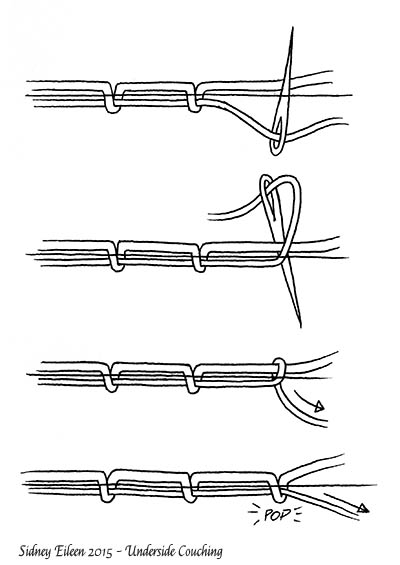
To underside couch:
Tuck the starting end of your metal thread through the stitches on the back side.
Secure your couching thread on the back side.
Bring your metal thread to the front of the work.
Bring your couching thread to the front of the work at the next stitch location.
Loop your couching thread over the metal thread.
Run your couching thread to the back through exactly the same hole.
Hold your metal thread straight across the surface of the work.
Pull on your couching thread until you hear a slight “pop” of the metal thread dipping through to the back.
Bring your couching thread to the front of the work at the next stitch location. Repeat.
Additional Resources
My Opus Anglicanum Pinterest board – has many pieces of Opus Anglicanum not shown in this tutorial and also contains non-Opus Anglicanum pieces of embroidery that have been created with a similar aesthetic for design inspiration.
Hedgehog Handworks – Shop that sells specialty embroidery supplies including flat silk, metal thread, and ecclesiastical linen
Young, Bonnie. “Opus Anglicanum.” “Ecclesiastical Vestments of the Middle Ages: An Exhibition”: The Metropolitan Museum of Art Bulletin 29.7 (1971): 291-98. Print.